Showing posts with label Cards. Show all posts

Tuesday, October 15, 2013

Pyramid Santa Made With MMS4

One of the things you can make very easily with MyMemories Suite 4 is pyramid cards.  A pyramid card is made by layering an image so that each successive layer is smaller.  Here’s one I made yesterday evening.

DSCF2541w

The Santa image I used is from an old PcCrafter set.  Here’s a video tutorial I made showing how to make pyramid cards using MyMemories Suite 4.

Saturday, October 12, 2013

MyMemories, It’ Not Just For Scrapbooking!

So you say you’re not in to scrapbooking?  That’s OK. You can do a lot more than just scrapbooking with MyMemories Suite 4.  Here’s a card I made recently using the Soft Nostalgia digital paper pack, Bodacious Bloossoms cutting file and Fairy Wishes digital stamps from PaperWishes.  The rick-rack on the inside is one of many included embellishments in MyMemories Suite.

FairyCard1w  FairyCard2w

Some of the elements are printed on the background and others were printed separately and layered on top.  I really love that I can size everything to fit the card.  No more struggling to find a frame to fit a stamped sentiment or vise versa.

Sunday, July 21, 2013

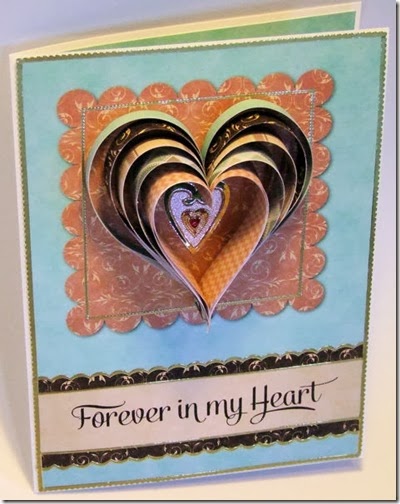
Forever In My Heart

Besides scrapbooks you can make lots of other things using MyMemories Suite 4.  Here’s a card I made with the HoneyChurch Layered Paper Hearts kit.
hearts20130721

The quick page I chose makes a heart that gets thicker toward the center.  The patterns and quick pages, when printed full size (8.5” x 11”), make a fairly large heart.  Since I wanted something I could put on a card, I reduced my chosen quick page 1/4 size.  I designed the front of the card in MyMemories Suite 4.  It was very quick and easy to do.  First I added a 4.75” x 6.5” rectangle and filled it with the Aqua paper included in the kit, then I added the shapes I wanted and filled them with paper.  When I was done, printed it, cut it out and added it to the front of a card blank. 

The instructions for the heart, posted on the MyMemories site say to print two copies, but if you want the paper to show on both sides, you will need to print four copies.  After cutting the strips out, arrange them in pairs, back to back so the color will show on both sides. 

After making the heart, I glued it to the front of the card, then I added a layered heart dazzle to the center and border dazzles along the edges.

If you’d like to purchase MyMemories Suite 4, be sure to use coupon code STMMMS97442 to receive $10 off the purchase price plus a $10 gift certificate to use in the My Memories online store.

Sunday, March 24, 2013

Easter Chick

MyMemories 4 isn’t just for scrapbooking.  You can make other things with it too.

This week, I decided to make an Easter card using the Easter pack that came with the MyMemories software.  Since there isn’t an egg in the provided shapes, I loaded a circle into the shape editor and made my own egg shape.  It was really pretty easy to do.

easter20130322

I created the apertures for the iris folding by layering two egg shapes for each egg, one slightly smaller than the other.  I colored the larger bottom layers pink and purple and left the top layers white.  After printing the card, I cut out the white egg apertures and added the iris folding.  The papers for the iris folding are also from the Easter paper pack.  After completing the iris folding, I added pink and purple glitter paper behind the openings.

I printed two copies of the chick and layered them using foam tape.  The bottom layer of the chick is the complete image and the top layer is just the top and bottom shell and the bow.